How To Configure WIFI Printer in OrderPal App for Your Business
Launch the OrderPal Order Receiving App, login using the credentials provided during your store signup. You login credentials have also been sent to the email account provided by you during your store sign up.
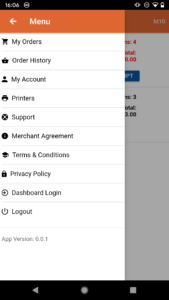
Step 1 – Tab the top left corner “menu” icon, then find “Printers” (menu->printers)
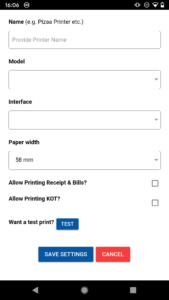
Step 2 – Add printer by tabbing the “+”
Step 3 – Configure your business printer.
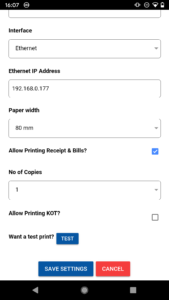
- If you are using the OrderPal Ethernet printer, the configurations are Model: Genetic Printer; Interface: Ethernet; Ethernet IP Address: (Please see How To Configure OrderPal Ethernet Printer with your WIFI Network on how to retrieve the IP address); Paper Width: 80mm
- If you are using the OrderPal Handhold printer, the configurations are Model:TPS900; Interface: USB, Paper Width: 56mm
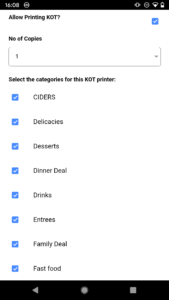
Step 4 – Specify printers for your purposes. For instance, you can assign a printer for both receipt & Bill printing and KOT printing; or you can configure two printers, one for receipt & Bill printing, one for KOT printing. You can also control how many copies of each printing you would like. For KOT print, you can also specify which product category you want to print. (We recommend you select all categories for KOT printing).
Step 5 – It is recommended to test the printer before you save the settings. That will make sure the configurations are correct.


